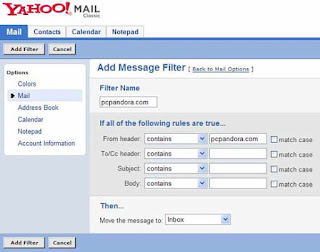
 Maybe there is so may emails in your mail box. Like your personal emails, office mails, friends mails and many more. Sometimes it is very difficult to find out the one which you need from these huge emails. Have you think about the mail filter that can filter each mails according to your need? This is possible. For example, you can create a folder named ‘office’ and if you adjust a little setting you will get all the email form your office in the ‘office’ folder. If you think this setting is useful to you follow the bellow steps:
1. Open the mail you need to adjust the filter setting.
2. Go to option > Go to filters > Click to add > now give the filter name (example: ‘office’)
3. Select ‘to new folder’ in the ‘move the message’ option. Give the name of new folder as ‘office’. 4. Save.
(याहू मेलमा तपाईंको थुप्रै ईमेलहरु हुनसक्छ। तपाईंको ब्यक्तिगत ईमेल, अफिसको ईमेल, साथीको ईमेल अनी अरुपनि महत्तोपूर्ण ईमेलहरु। यो सबै ईमेल एकैठाउँमा आउँदा कहिलेकही तपाईंलाई चाहिएको ईमेल खोज्न निक्कै मेहेनत गर्नुपर्ने हुनसक्छ। के तपाईंको मनमा कहिलेकही यो बिचार आउछ कि यो ईमेलहरुलाई फिल्टर गरेर अलग अलग फोल्डरमा आउने बनाउन सकियोस। यो सम्भव छ। उदाहरणको लागि तपाईंको अफिसको ईमेलहरुलाई एउटा 'office' नाम को फोल्डरमा रीसीभ हुने बनाउन सक्नु हुन्छ, जस्मा तपाईंको अफिसको ईमेल मात्र आउछ। तेस्तै तपाईंले चाहेको ईमेलहरु अलग अलग फोल्डरमा आउने सेटिङ मिलाउन सक्नुहुन्छ। यदी यो सेटिङ तपाईंको लागि उपयोगी हुन्छ भने तल दिएको स्टेपहरु लाई फलो गर्नुहोस्।
 1. तपाईंले सेटिङ मिलाउन चाहनु भएको याहू मेल ओपेन गर्नुहोस्। 2. option मा जानुहोस्। 3. अब filters मा जानुहोस्। 4. add मा क्लिक गर्नुहोस्। 5. filter name भन्ने ठाउँ मा filter को नाम दिनुहोस्। जस्तै //office//
 6. अनी अफुलाई चाहिने rules, जस्तै तपाईंको नयाँ फोल्डरमा आउने email को subject, body, header हरु आफुलाई चाहिने अनुसार सेलेक्ट गर्नुहोस्। (उदाहरणको लागि तपाईंको अफिसबाट आउने ईमेल address लाई header मा राख्न सक्नुहुन्छ। अब त्यो ईमेल address बाट आउने सबै ईमेलहरु तपाईंले बनाएको नयाँ फोल्डरमा मात्र आउछ।) 7. अनी 'move the message' भन्ने option मा 'to new folder' लाई select गर्नुहोस्, र नयाँ फोल्डरलाई नाम दिनुहोस्। जस्तै ‘office’ 8. अब add filter मा क्लिक गर्नुहोस्। अब तपाईंको अफिसको ईमेल address बाट पठाइएको ईमेलहरु तपाईंको 'office' भन्ने फोल्डरमा मात्र आउछ। यस्तै गरी तपाईंले चाहनु भएको जस्तै गरी बिभिन्न filter हरु बनाएर आफ्नो काम लाई छरितो बनाउन सक्नुहुन्छ।)
No comments:
Post a Comment